Promoted to Knowledge Base
Articles in this forum have been promoted to our Knowledge Base for long term preservation. Comments here are still open, but, the main article will be featured in our Knowledge database.
23 topics in this forum
-

- 3 followers
- 4 replies
- 461 views
Stumbled across this today and downloaded a copy. Lots of interesting info for the Z and other Datsun's here including production run changes with VINs, and other things like the original add on (after-market) air conditioning info. http://240260280.com/Docs/TSB/Technical_Bulletins_1969_1972.pdf
 Last reply by SteveJ,
 -
-
- 1 follower
- 0 replies
- 3.4k views
Here is a DIY headlight relay modification that I implemented on a friend's 73 this weekend. This will not work on early Z cars where the headlight switch completed the path to ground. Parts needed: 2 SPDT or SPST automotive relays with bases 14 AWG wire - It is good to have many different colors to keep things straight 12 AWG wire Electrical tape to wrap your wire bundles 1 3-pin 6.3mm non-latching connector (male and female) 1 6-pin 6.3mm non-latching connect…
Last reply by SteveJ, -

- 1 follower
- 5 replies
- 2.4k views
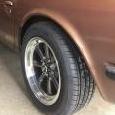
New respect for tires after this:
 Last reply by rturbo 930,
 -

- 2 followers
- 2 replies
- 2.4k views
My 1971 240Z has an electric problem. With the key on I can start the car, the radio works and the brake lights but none of the gauges work. Fuel, tach, oil amp etc. They all worked the last time I drove it but now nada. Is there a master fuse link or place to start checking. I have a test light. The battery is fully charged. Thanks
 Last reply by siteunseen,
 -
- 1 follower
- 4 replies
- 6.4k views
For all those with the original style paper/cardboard glove box insert (left image) in their 240z, I found a cheap and easy way to upgrade to a plastic insert from a later 280z (right image). I picked my used 280z insert up for $10 on ebay a while back. Here is the picture of what I started with. A huge cut in the back of my cardboard insert from the prior owner. Its only gotten bigger since I've owned the car Old and new side by side. The 280z plastic insert will need to be trimmed to fit. There are various approaches, I chose to trim just the bottom tab and the made a new hole for the glove box door arm The finished product is much nicer…
Last reply by Jarvo2, -

- 4 replies
- 6.2k views
I decided to refurbish a set of 240Z tail lights that came off a parts car and quickly hit the problem of removing the push locks on the back of the lights. Suffice to say, the pin snapped off flush with the back on each unit as I worked on them. Once the lens was separated from the back, removing the push locks from the other pins was pretty straightforward and nothing else broke. After the cleanup was done, it was time to figure out how to re-attach the chrome strip to the lens - including the center post. I checked this site and reviewed some efforts by other members but decided to go with something of my own design. The idea of a coupling nut was my focus but …
Last reply by jfa.series1, -
- 11 replies
- 10.9k views
Installing a GM HEI Ignition Module into a 1976 280Z (which already had a ZX ignition) This article describes how to upgrade a ZX ignition module to a GM HEI module. In this particular case, the ZX ignition module happened to be installed in a 1976 280Z which had been upgraded to a ZX distributor/ignition module using the Atlantic Z Club instructions. The purpose of the HEI install was to fix a sudden engine cut-out problem and a jumpy tach problem. Heat Sink The first thing I needed was a nice heat sink and, afters scouring the basement and considering attacking an old Western Electric telegraph test set with a hack saw, I laid eyes on a stack of these: Which …
 Last reply by TomoHawk,
 -

- 4 followers
- 9 replies
- 7.9k views
Z's are notorious for leaking exhaust gasses (or fumes) into the interior. This article details a procecss to find and eliminate the sources. To make the article easier to read, key photos are hot linked, while additional views just have a hyperlink you can click on. When driving with a window open, the air rushing around the windshield and drip moulding creates low pressure in the front half of the open window. This vacuum is what draws the air in the back half of the open window, and ultimately draws in exhaust fumes through any leak near the back of the car. If the windows and doors do not seal well, exhaust is drawn in (to a lesser effect), even with the windows c…
 Last reply by 240dkw,
 -

- 2 followers
- 23 replies
- 14.7k views
For those of us with original fuel pumps on our 240 and 260Zs, those pumps are now at least 35 years old. Obviously, if they haven't yet been replaced, the time of need can't be far away. In most cases, the obvious answer is to simply replace the pump, either with a new mechanical pump or convert to a modern electric pump. But the original pumps were designed to be rebuildable. For those of us with restored or original survivor cars, rebuilding the original pump is one way to retain some of the car's originality. It's also surprisingly affordable. Of course, it's not as easy as it used to be. Many of the parts shown below are no longer available from Nissan. But the cri…
 Last reply by Mike,
 -

- 14 followers
- 117 replies
- 94k views
Tired of the old SLOW and Tired wipers on your 240Z? Ya, Me too. SO I did some research on the subject over at HybridZ and found that for a few years now, people have been trying to use the 94' Accord and 91' Civic wiper motors as a replacement to the Datsun wiper motor that ONLY like to move if the window is WET... So I read every thread and post on the subject to find out as much as possible. All I found was pictures and posts by people saying that "it works great BUT..... The wiper does'nt PARK when you turn the switch to OFF. You have to shut the wiper switch off at the EXACT moment to get the blades to sit in the usual DOWN position. So I went to the junk yar…
Last reply by SteveJ, -
- 8 followers
- 55 replies
- 41.3k views
As part of the slow refresh of my red '71 240Z I knew I needed to replace all the fuel hoses, especially the big ones that go to the expansion tank in the right rear quarter panel. I'd read all the instructions for saving money by using generic fuel-rated hose and inserting sleeves in them to keep them from kinking and such. But since I am more than a little reluctant to pollute my red car's originality, and also because I really didn't feel like messing with bending and inserting sleeves, I decided to bite the bullet and buy factory hoses. As a side benefit, I figured I could advise others on whether this was as good an idea as it seemed to me at the time. So now that it…
 Last reply by lenponz,
 -

- 28 replies
- 10.6k views
At the front of the radiator you'll find two pairs of wires both Red and Black. Typically they're taped to the harness with Blue electric tape. Those are the connections for the Fog Lamps in parallel (that means they are both powered off the same circuit, but not dependent on one another to work). Inside the vehicle, typically behind the Fuse Box or Hazard Switch, (depending on whether the bundle has been moved or not) you'll find two sets of 2-wire connectors. In my car they were connected to each other even though neither circuit was operational. The first circuit is for the Fuel Pump (Electric) and it's pair of wires are Green and Black/White. You can see the i…
 Last reply by rtaylor,


-
Recently Browsing 0 members
- No registered users viewing this page.